
Web Development
Top 10 Webflow Portfolio & Agency Templates to Use in 2026
June 6, 2023
·
10 min
If you are a small business owner, designer, developer, or who needs a small website. You can easily make a custom website in Webflow. Webflow is the next-generation cloud-based CMS or web publishing system. Webflow is suitable for most websites, minimizes maintenance, and maximizes reliability. Webflow CMS helps you to easily maintain your content like portfolio or blog articles.

In today's article, I am going to show you the way you can publish your website without any experience. If you want to have your advance customized website then you need to learn more from Webflow University.
On webflow, you can edit your content from the front side of the website. Webflow provides hosting service & their large collection of templates makes it easy to make websites easy for users. Webflow has the best CMS which helps you to manage your blog or content smoothly.
Webflow offers tools and features that allow you to optimize your website for search engines, which is crucial for better visibility and discoverability.
Webflow generates clean and optimized code, which can contribute to faster loading times and better website performance.
It's important to note that Webflow might not be the ideal solution for every project. While it offers a powerful set of features, there might be instances where more specialized tools or custom development are more suitable.
Here are the few steps you need to take to make your website in web flow.
At the beginning you have to make sign up on weblfow.
So you have got the summary now, it’s time to follow me for the details.
Signing up on webflow is easy but you have to be careful about what you need. Webflow has 2 plan workspace & site plan. You can get a free workspace that can be used to learn & practice webflow without publishing online. Here are the steps to sign up on webflow.
Visit the Webflow Website: Open your web browser and navigate to the official Webflow website at https://webflow.com/.
Click on "Get Started": On the Webflow homepage, you'll likely see a prominent button or link that says "Get Started" or "Sign Up." Click on this button to begin the registration process.
Choose a Plan: Webflow offers different plans, including a free plan with limited features and paid plans with more advanced features. Select the plan that best suits your needs. Keep in mind that paid plans offer more functionality and customization options.
Create an Account: You'll be asked to provide your email address and create a password for your Webflow account. Alternatively, you might have the option to sign up using your Google account.
Verify Your Email: After providing your email address, you'll receive an email from Webflow with a verification link. Click on the link to verify your email address.
Complete Profile Information: Once you've verified your email, you may be asked to provide some additional information to complete your Webflow profile. This could include your name, company name (if applicable), and other relevant details.
Start Using Webflow: Once you've completed the registration process, you'll likely be directed to your Webflow dashboard. From here, you can start exploring the platform, creating projects, designing websites, and more.
After signing up now you need to follow the next 4 steps.
You can find free templates & paid templates, from the Webflow template market. After buying a template it will appear on your dashboard workspace. By clicking on the template you entered inside the template. The webflow designer appears like photoshop. It will be better if you watch a tutorial about the basics of webflow designer. On the left side, you get the components, navigator, CMS, pages, e-commerce, and assets tools. On the right side, you got the style manager, settings, style & interaction of the template.
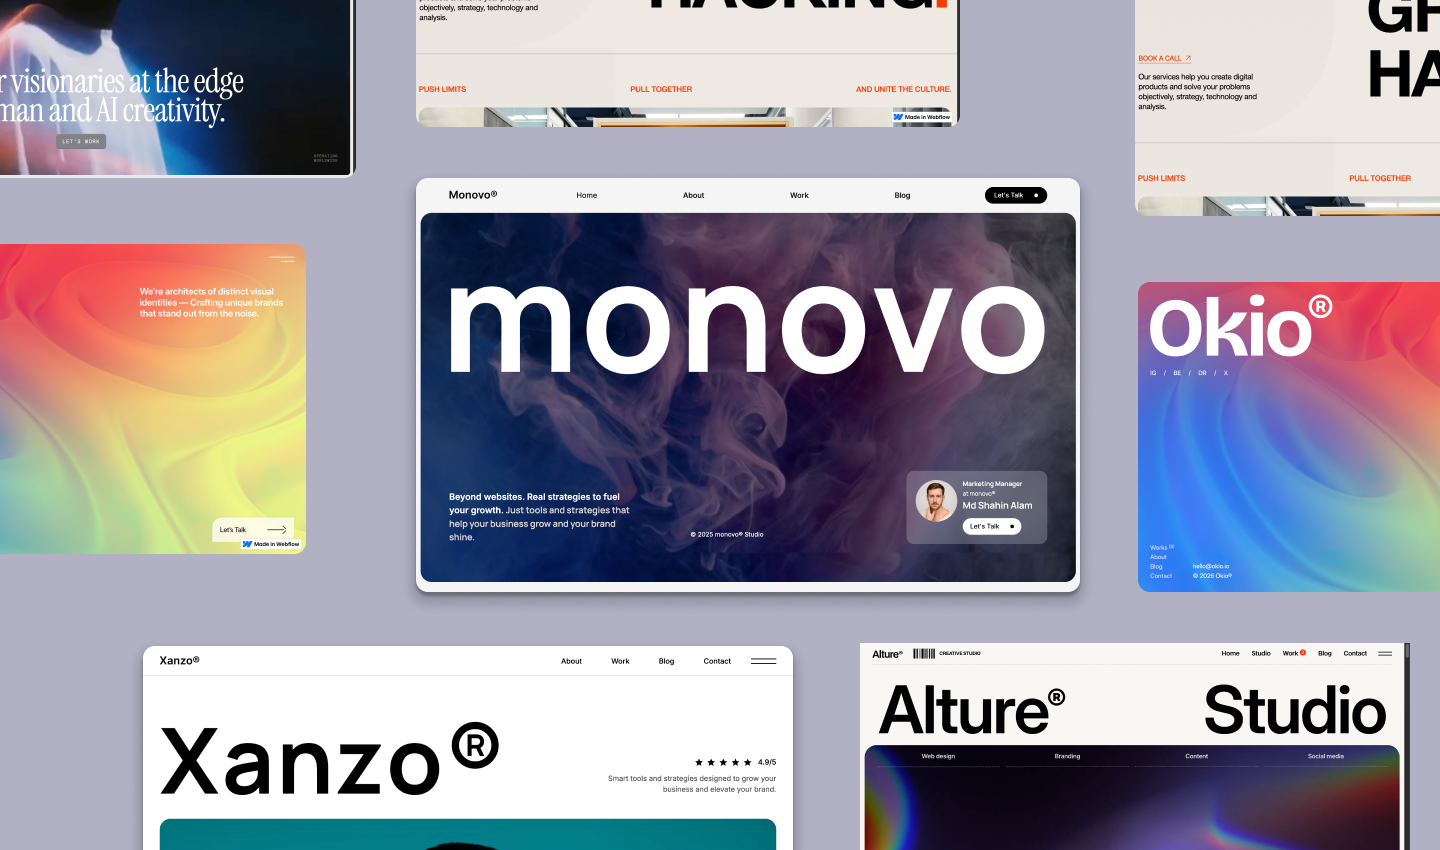
You can find the best template for free, Here is my top 10 list
The template has pre-maid assets, if anything meets your requirement you can keep it. But your site needs your logo, text, photo. So at the beginning, you can delete most of the assets that are not needed. But you should delete it from the assets tools, not from the actual template. You need to replace them. To replace you need to add your assets to the asset panel first.


To update the heading & paragraph contents with your texts. You just need to double-click them & paste your texts.
So if your template has got cms items. You can not edit them directly but you have to click on the cms panel & update the fields according to your needs. On the read-only link, you can check the CMS panel of the template. Get that template that fits your needs. CMS is a dynamic panel you can add items regularly for blogs or any kind of content creation.

On the color swatch, you can edit & save your color palette. Also, you can add color by selecting any elements.
As a beginner without experience, you should not edit any CSS properties as it will mess up the design of the site & you won’t be able to handle it.
For the responsiveness of the site, you don’t need to give a headache as the template maker has already made it responsive.
To publish a website you need a domain. There are lots of domain providers you can select them. Right now I am not recommending anyone because no one did pay me to do this 😀 😀 😀
To publish a site to a domain you need to have a plan. You can check the webflow site plan here. CMS plan is the most popular among the users. You can check this tutorial on how to connect the domain to the webflow site. Once you connect the domain you can always publish your site. When you make any changes you need to republish your site. So after that your site will be published.
I have written this article for beginners only as web flow require some learning curve so a new user can bypass the learning time using webflow template. I will write more about how anyone can create a custom site from webflow.
If you need help creating or customizing a website or want to learn more about webflow. Write me.. ✉️ shahin3647@diu.edu.bd
Using Webflow offers several advantages for web designers, developers, and businesses looking to create and manage websites. Here are some key advantages of using Webflow:
Visual Design and Development: Webflow's visual interface allows you to design and develop websites visually, making it accessible to both designers and developers without extensive coding knowledge.
Responsive Design: Webflow encourages and facilitates responsive web design, enabling you to create websites that look and function well on various screen sizes and devices.
No Code or Low Code: While Webflow involves some coding concepts, it significantly reduces the need for manual coding, making it a great option for those who want to create websites without delving deep into coding.
Custom Interactions and Animations: Webflow lets you create custom interactions and animations without relying on external libraries or complex coding, enhancing the interactivity and engagement of your websites.
Content Management System (CMS): Webflow provides a built-in CMS that allows you to manage and update website content easily. This is particularly useful for websites with dynamic content, such as blogs, portfolios, or news sites.
E-commerce Capabilities: Webflow's e-commerce features enable you to set up online stores, manage products, and process payments, providing a platform for businesses to sell products and services.
Hosting Included: Webflow offers hosting services, eliminating the need to find external hosting solutions. This streamlines the process of getting your website live on the internet.
SEO-Friendly Tools: Webflow provides tools and features to optimize your website for search engines, helping improve its visibility and search engine rankings.
Custom Code Integration: While Webflow emphasizes visual development, you can still integrate custom code snippets or scripts when needed, providing flexibility for more advanced features.
Community and Resources: Webflow has an active community of users, and the platform offers a range of tutorials, templates, and resources to help you learn and maximize the platform's capabilities.
Speed and Performance: Webflow generates clean and optimized code, contributing to faster loading times and better website performance.
Collaboration Features: Webflow offers collaboration tools that allow multiple team members to work on the same project simultaneously, making it easier to manage and develop websites as a team.
Design Flexibility: Webflow provides a high level of design flexibility, allowing you to create unique and customized designs without being limited by templates.
Version Control: Webflow includes version control features, which lets you track changes and revert to previous versions of your design or content.
Professional Results: Webflow enables you to create professional-looking websites that can compete with those developed using traditional coding methods.
It's important to evaluate your specific project requirements and goals to determine whether Webflow is the right tool for your needs. While Webflow offers numerous advantages, it might not be suitable for every type of project.
One potential disadvantage of using Webflow is that its learning curve can be steep for those who are new to web design and development, particularly if they have little to no experience with design principles, coding concepts, or visual development tools.
Some people also have issues with the pricing but whit all the flexibility one can consider using webflow with a little extra price.
In conclusion, Webflow offers a host of advantages that make it a compelling choice for designers, developers, and businesses seeking to create visually appealing and interactive websites. Its visual design interface, responsive capabilities, low-code environment, and integrated content management system provide powerful tools for creating professional-grade websites without extensive coding knowledge. Additionally, features like custom interactions, e-commerce support, and SEO tools contribute to a well-rounded web development experience.
However, it's important to consider the potential downside as well. The platform's learning curve may pose a challenge for newcomers, particularly those unfamiliar with web design principles and workflows. While Webflow's visual approach streamlines the design process, some projects may require complex coding or integrations that could be more efficiently handled through traditional development methods. It's crucial to carefully assess project requirements and the team's skill set to determine if Webflow aligns with the specific goals and demands of the task at hand.
In essence, Webflow's advantages in terms of visual design, responsiveness, and user-friendly features make it an appealing solution for many website development projects. However, its potential limitations should be weighed against the benefits to ensure a well-informed decision that meets both short-term objectives and long-term scalability.
You can find the best template for free, Here is my top 10 list

I am a designer & business analyst. Throughout my career, I just did not design interfaces. I helped my client to build a business as well. I have focused on how human psychology, design, and technology intersect. It is this awareness and understanding that leads me to distill complex problems into simple and elegant solutions.

Learn the strategies and get best update from us!
Start your website with a template & have your website in no Time

